|
Gerry tells us of his experiences
assembling a TITCH kit:
Gerry Bullock building a Gine Loco?
An unlikely story! I'm afraid it's true. I vowed I'd never have
anything to do with 9mm track having seen the problems others
seem to have with running qualities of the tiny mechanisms. However
my Machine shop layout does have 9mm track to move heavy objects
(by hand) between the machinery. It runs for 500mm, the length
of the shop with a wagon turntable at the right hand end. The
track turns at right angles to another turntable some 80mm closer
to front of layout. Finally the track exits right, via a long
corridor which is part of the fiddle area.
When I saw Steve's Titch I realised that in conjunction with
the Gn15 Traverser System within the Machine Shop I could add
a GNine line operating on the Shop Floor. This line will merely
bring boxes to the forward Turntable from the corridor. I plan
to use an automatic system with Loco and single wagon entering
from right, wagon uncoupled then Loco exits right back into corridor.
This ensures that the shunting operations utilising the traverser
and requiring two Locos are not compromised by having to operate
the GNine system.
But back to Titch, a simple build consisting of 15 different
components. The illustrated instructions provided by Steve are
excellent. I would expect anyone unfamiliar with resin kit building
would be capable of producing an acceptable model.
My only reservation is the use of Superglue. Confession: I was
frightened of the stuff before ever using it and would recommend
use of the thicker version if you are unfamiliar with the Product.
Why, because the grab time is that bit longer than the thin versions
that I now happily dab around with gay abandon. Stuck fingers,
no problem, just cut them apart with your knife. Just don't rub
your eyes when using the stuff (VBG).
The power unit used is a Bachmann Plymouth Switcher available
(in UK) from Hattons although I bought mine boxed New from an
eBay seller at around £2 less including postage.
Warning: don't remove body until you're sure it runs well!
The power unit certainly fits snugly into the Chassis Housing
BUT I cut grooves in each buffer beam hoping to use the existing
Bachmann couplings. Don't bother it doesn't work should
have asked my Club's N Scale members first.
I found all the mouldings crisp and few had any flash; the little
there was was easily removed with a sharp modelling knife.
I'll not elaborate on the build details as they are detailed,
with illustration, in the instructions supplied with the kit.
As fellow Gn15 Modellers will know my rolling stock has a somewhat
weather beaten look so I tend to ignore one of the recommendations
that accompany resin kits " wash in warm soapy water
to remove any traces of grease or dust". I don't and am
happy to accept the grotty finish resulting albeit unlikely in
my experience with a Sidelines Kit.
|
Any imperfections are left and incorporated
into the rust/weathering process.
I don't use an Air Brush as I'm unwilling to clean the system
after each useage. I have always used Aerosol Paints usually
selecting colours from the vast range available from Halfords
though I do have a few Humbrol spray cans.
I generally use Red Oxide as the undercoat
as this serves as a superb base upon which to add rust. I also
don't wait for the paint to dry but will spray a second colour,
for Titch a Green, over selected areas of the Loco. Note not
over whole Loco. This is to simulate the several colours often
found on old Locos as a result of repaints. By all means use
more than one colour as the underpainting progresses. Then let
the whole thing dry, should be overnight but I'm satisfied with
a couple of hours when I add Artist's Masking fluid to areas
which will subsequently show rust and the previous paint colour(s).
There is a product available in the UK called MASQUEPEN, blue
in colour. The squeeze bottle enables the precise application
of the fluid via a narrow tube to the smallest nook or cranny
on the model. You do need to let this dry the thicker the application
the longer it takes.
When dry I applied the final coat(s) using a Car Beige and left
the model to dry for several hours. When dry the areas masked
can be carefully removed with a finger nail or cocktail stick.
I then apply 'rust' to the red oxide areas using Gaming Acrylics.
Colours used are a matter of personal choice, mine consist of
dark brown, terracotta, and muted yellows. You could also use
weathering powders although I tend not to on rolling stock. Some
dry brushing with Black Acrylic was also used to simulate oil
leaks, just two small areas beneath the bonnet doors.
I then hand paint the detail parts. For Titch this included the
Buffer beams (Humbrol Enamel Red) and the Side frames (Black
Acrylic) as well as the various levers and filler caps. Although
using Acrylics I use Artist quality Watercolour Brushes which
I find give a better finish than Acrylic Brushes. I often use
a Rigger brush for fine detail (used to paint rigging) and therefore
capable of producing very fine lines with a little practice.
I don't use watercolour brushes for the Enamel!
I should add that both the end beams and sideframes were only
sprayed with Red Oxide and were masked when using the Green and
Beige Aerosols.
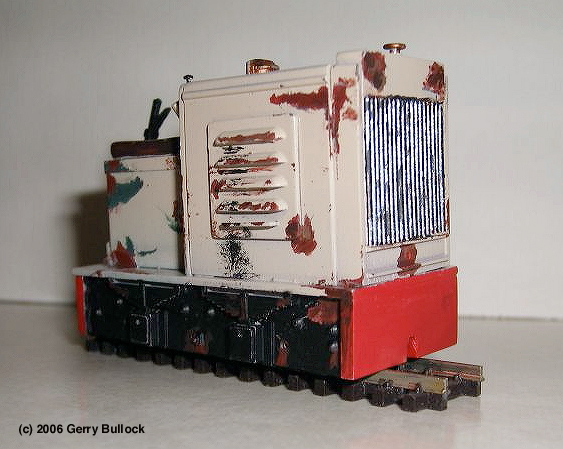
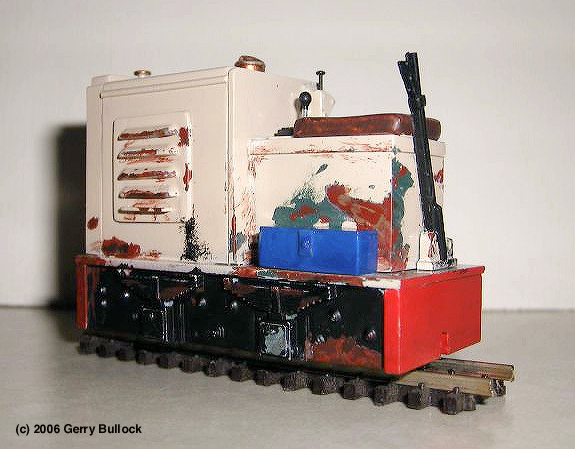
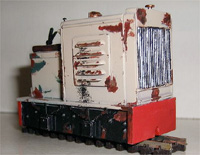
Photographs show the finished model including the unnecessary
beam cutouts! The Blue Toolbox is brand new as the old one fell
apart!
There are no coupler pockets as yet as I'm awaiting the small
wagon developed by Steve to ensure they are located correctly.
Click here
to move on to Barry Westons model or here
to see Ian Holmes' version
|